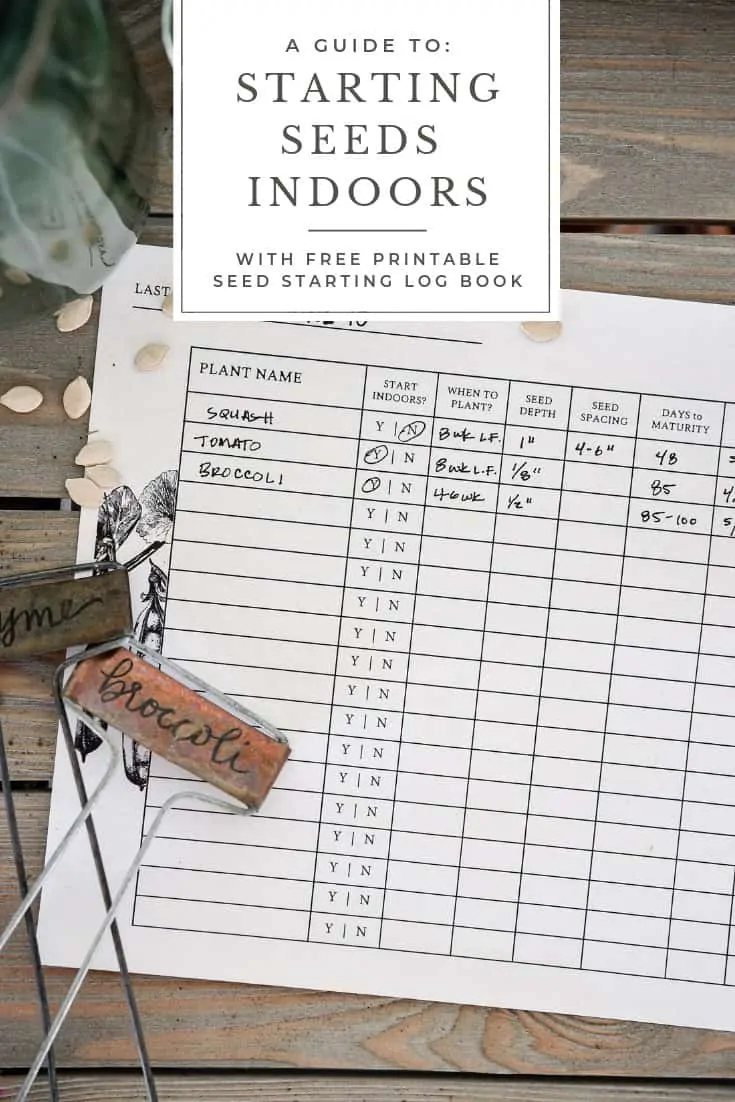
Learn how to start your seeds indoors to get a jump start on your garden! Plus download my free printable seed starting log book!
Everything you need to know about: Starting Seeds Indoors
If you live in a cooler climate that prevents you from growing fruits and vegetables with a long growing period, you might consider starting seeds indoors!
By starting seeds indoors, you can get a jumpstart on your vegetable garden and grow vegetables that wouldn’t typically thrive in your gardening zone. Read below to learn how to start seeds indoors!
Table of contents
- Everything you need to know about: Starting Seeds Indoors
- Why Start Seeds Indoors?
- How to Start Seeds Indoors
- Seed Starting Supplies
- How to Keep Track of Seedlings:
- Frequently Asked Questions: What fruit and vegetable seeds can be started indoors? What seeds shouldn’t be started indoors? When should seeds be started indoors for spring gardening?
Why Start Seeds Indoors?
Since many delicious fruits and vegetables take 100+ days to mature (harvest), a gardener needs ample growing time! However, if you live in an area with a late last frost date, this is nearly impossible.
A gardener then faces two alternatives: she can either purchase pre-started young plants to plant in her garden or she can start her own seedlings in the spring.
It is very cost effective to start one’s own seeds, plus it gives you complete control over the plants you grow in your garden! By starting seeds indoors, you will be able to grow a variety of fruits and vegetables that cannot be found easily at a local nursery.
Plus, you know that these fruits and vegetables were raised without any sprays or pesticides. Short growing season? Leafy green veggies are your best friend! Read more here.
How to Start Seeds Indoors
Step 1: Determine your Gardening Zone & Last Frost Date
Before you start any garden, be it a flower garden or a vegetable garden, you must determine your gardening zone and last frost date.
Your gardening zone will signal the types of plants you are able to grow in your garden. When purchasing perennial plants, check the label to confirm that the plant will thrive in your gardening zone.
For example, if you are located in zone 6, you can grow plants labeled anything zone 6 or lower, but cannot grow anything that is indicated in a higher zone.
Check your Exact Gardening Zone
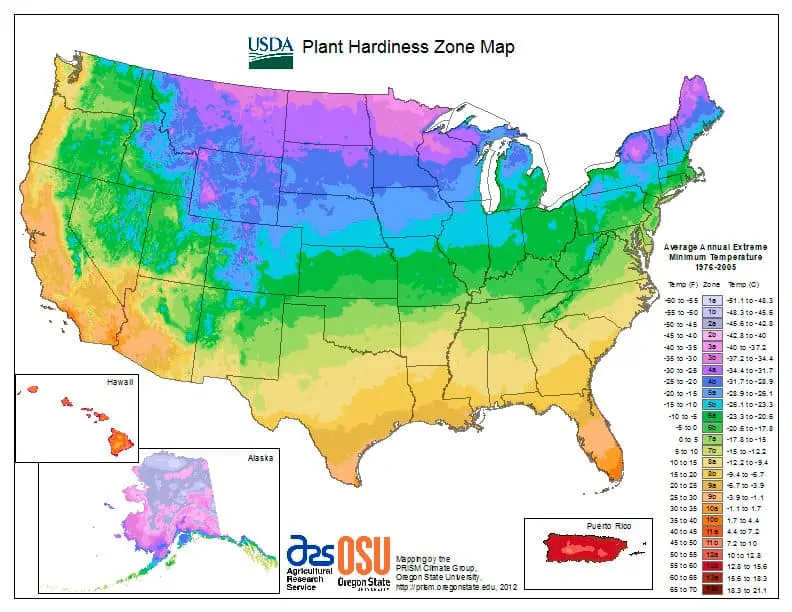
Gardening zones are less important for summer vegetable gardens, which are most often planted annually. However, some fruits and vegetables are perennial, and will continue to come back without planting year after year (artichokes, rhubarb, and berry shrubbery are all examples).
If selecting trees for an orchard, blackberries, blueberries, or other perennial fruit or vegetable, make sure it will grow well in your gardening zone.
More importantly, you must determine your area’s last expected frost date. This will signal when it is considered safe to begin gardening.
While some vegetables can withstand a frost (kale, broccoli, and other fall/winter veggies), many fruits and vegetables will be killed during a frost. This is especially true for tomatoes, peppers, and squash (among others).
If you live in an area with an extended spring, you may experience a very late frost date. For example, my last frost date is: “frost risk year round”. You can imagine that this is not very attractive to my green thumb. However, I have figured out that June 10th seems to be fairly safe, so I consider our last frost date to be right around there.

Step 2: Germination
Use sterilized equipment: this is important for success! You may think you can skip this step – but don’t! To sterilize gardening tools soak them in a 10% bleach solution (9 parts water: 1 part bleach) for 30 minutes, then rinse well. Note: if your tools are brand new, don’t worry about bleaching them.
Fill each seed starting container with seed starting mix. It is important to use seed starting mix rather than potting soil.
Seed starting mix contains the proper nutrients necessary for starting seeds, and is free of any bacteria that can potentially hard the young plants as they develop. You can alternatively use seed starting plug (pellets), simply plant the seed directly into the pellet and germinate as usual following the steps below.
Determine how deep to plant each seed into the pellets or containers (this information is on the seed packet). Each seed has different depth needs, and it is important to follow this pretty precisely.
You can mark an unsharpened pencil with measurements to use as a marker when creating holes for the seeds. If planting in rows, make sure to follow the seed packet guide for seed spacing.
Germinate the seeds by covering the trays/containers with plastic, and place them in a warm area, ideally 65-75 digress F. Bottom heat will provide you with the best results, so the top of a refrigerator is often recommended, but you can purchase a special germination tray that provides heat and airflow.
Humidity is key for proper germination, you want a warm moist environment for the seeds to germinate. Do not saturate the seedlings – the soil should be that of a moist kitchen sponge. DO NOT PLACE IN DIRECT SUNLIGHT.
Check daily for germination. The seeds have germinated once you see them peek their heads out of the soil. Once they have germinated, remove the plastic cover, and move to a well lit area.
Step 3: Growing Seedlings After Germination
Once the seeds have germinated, they will need direct sunlight to thrive. Place the trays in a bright, south facing window.
It can be difficult to provide enough sunlight indoors in the early spring, so a grow light is often used. Place the trays under the grow lights to provide continuous, steady light. As the plants grow, be sure to raise the lights. The fluorescent tubes should be 3-4” away from the plants at all times.
Plants should receive 14-16 hours of sunlight per day. Keep temperatures around 65 F. If the temperature goes too much higher than 65 F, plants can become spindly, and fail to thrive.
You can check soil temperature with an instant read thermometer. Plants will thrive with adequate humidity, and the use of a humidifier is helpful.
Keep plants moist, and do not overwater. Allow the plants to dry between waterings, but do not allow the plants to wilt. To water, the use of a mister is beneficial for the delicate young plants.
Fertilize the plants: After the plants have germinated, fertilize in two week increments. Be sure to dilute fertilizers properly as too much fertilizer can do more harm than good.
Step 4: Thinning
After the plants develop their first true set of leaves, you will need to weed out the weak and transplant to smaller growing pots for their remaining time indoors.
This is when the use of plugs/pellets is useful, because transplanting is easier! If you have multiple plants growing in a single pot or pellet, use scissors to cut down the weaker plants to the base of the soil (do not rip out which can disturb the root systems).
Allow only the strongest looking plant to remain.
Use a spoon or spatula to gently cup the seedling out of the growing tray. Place into a small growing container (such as a small terra cotta pot or even a red solo cup).
Fill with seed starting soil and dig a small hole in the new container, place the plant into the soil and pat the soil down. Water gently, and place back under the lights.
If you need to handle the plant, handle it gently by the leaves as the stem can be crushed easily. Drainage is very important as is cleanliness. Make sure to poke holes in the bottom of the container and only use clean tools (hands included!).
Allow the plants to continue to grow until the last frost approaches. Before transplanting to the garden, be sure to harden off the plants for best results. (see below for more details)
When to Transplant Seedlings?
Transplanting seedlings outdoors is like sending your newly graduated children off to college! You’ve worked hard for weeks to raise your plants to be ready for the great outdoors, but before transplanting your young plants, be sure to harden them off first!
Step 5: Hardening Off
Hardening off plants helps prepare them for their new life in the garden. 1-2 weeks before the last expected frost date, begin taking your plants outdoors. At first, place them in the shade in a spot where they will not be affected by wind. Do so for just a few hours at a time, bringing them indoors in the evening as the temperatures begin to drop.
Over the next week or two, gradually increase the sun intensity and time spent outdoors. This process of hardening off will give your plants a better chance at adapting to their outdoor environment when you transplant.
Step 6: Transplanting
Once your plants have grown to an easily handleable size, and have been hardened off, it’s finally time to plant them in your garden!! Be sure to only transplant to your garden once the last frost has passed.
How to transplant seedlings: Dig a hole about twice the size of the plant’s root mass (example: if the root system is the size of a softball, dig a hole the size of a volleyball). Gently remove the plant from its container, and place it into the new location, preserving as much of the seed starting soil as possible.
Place the plant in its new home, fertilize with a starter fertilizer, and cover with soil. Gently tamp down the soil, and water.
Transplanting is best on a cloudy day. If a cloudy day isn’t possibly, transplant in the afternoon after the peak of the sun has passed.
Now your plants are ready to thrive in their new home in the garden! Enjoy the fruits of your labor during throughout the summer!
Seed Starting Supplies
Starting seeds indoors is relatively easy and can be done with just a few supplies. You’ll need:
- Seeds (rare seeds | Johnny’s seeds)
- Seedling trays or pots (compostable version | plastic version – includes heat mat and cover)
- Garden markers / labels
- Plastic cover for tray (or plastic bag)
- Seed starting soil (important)
- Seed starting plug pellets (optional)
- Germination heat mat (optional)
- Organic seed fertilizer
- Grow lights
- Seedling log book (download mine for free!)
- unsharpened pencil or other small measuring tool
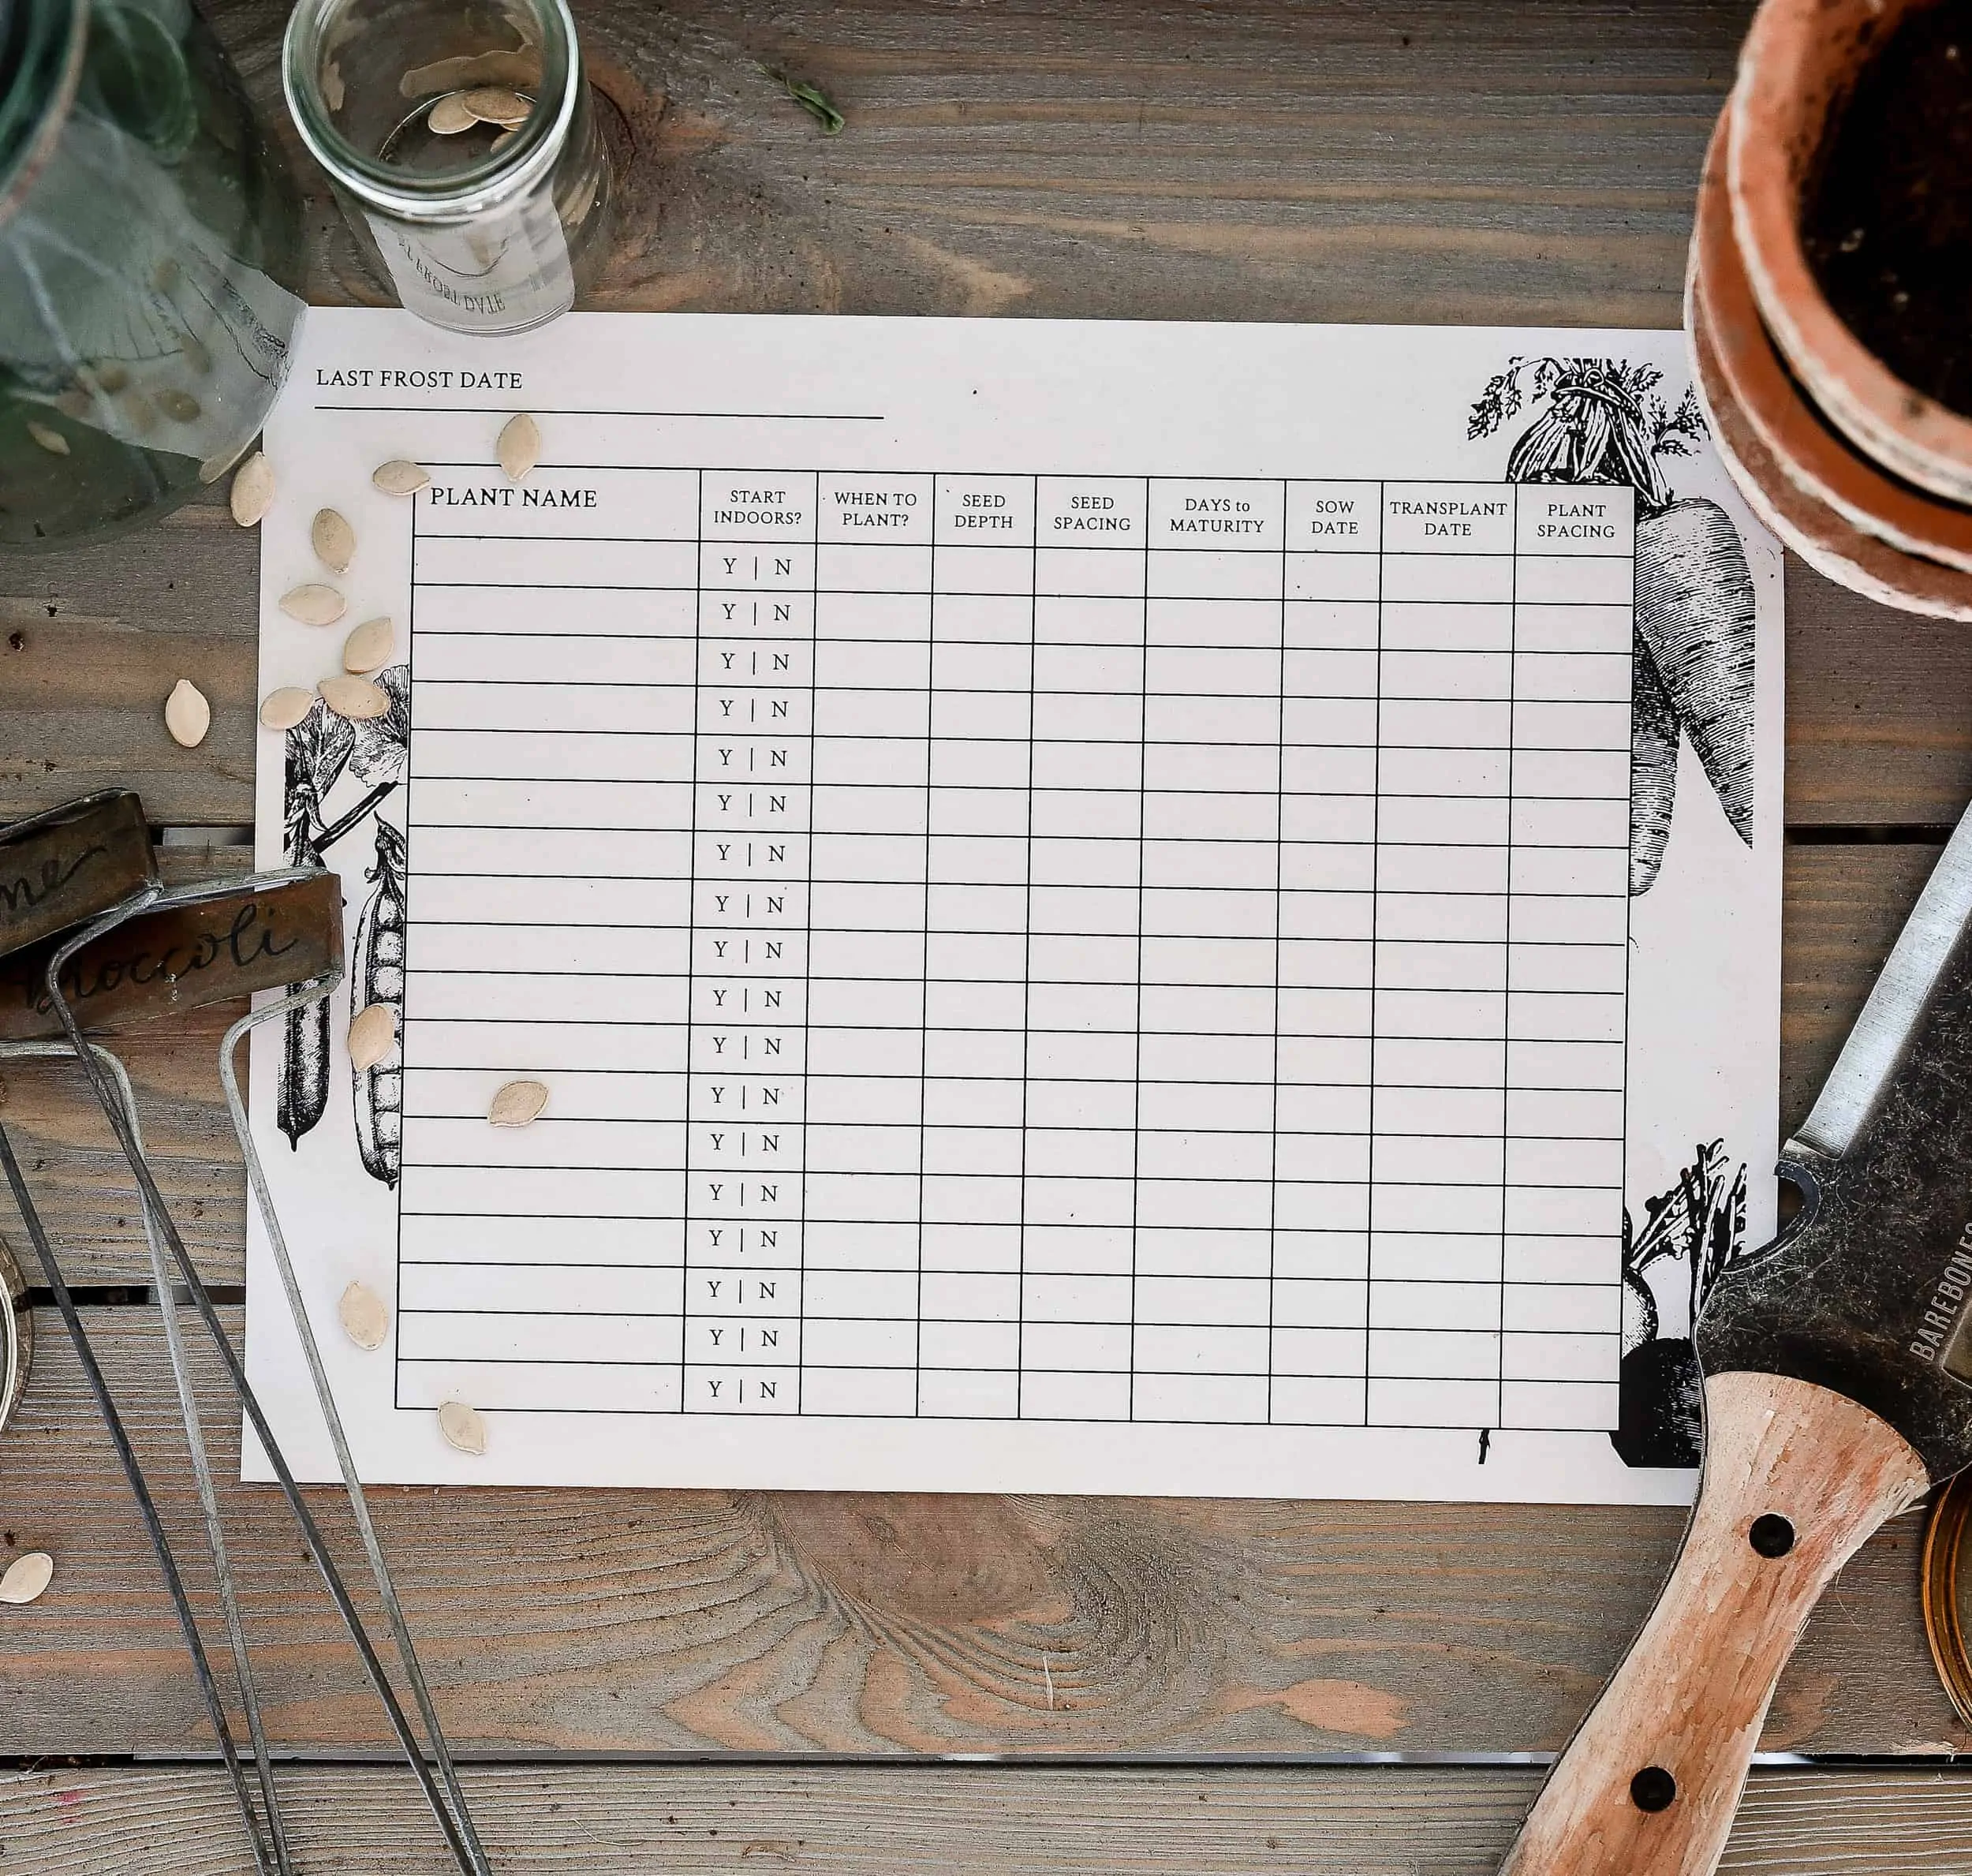
How to Keep Track of Seedlings:
As you begin starting seeds, it’s easy to lose track of when to plant and what you’ve planted!
Use popsicle stick markers, or designated seed starting markers to keep track of young seedlings. You can also write on strips of masking tape to mark out sections of a particular seed.
As the seeds grow into plants, and transplanting occurs, you can use plant markers to keep track of plants! Masking tape tags on the containers is also helpful.
It’s important to keep track of the plant varieties, but keeping track of important dates is just as useful! Dates such as: when the seed was sown, how many weeks it should be started prior to the last frost date, and how many days to harvest are all important dates when gardening!
You can create a gardening log book, or feel free to print off my free seed starting log book! This printable sheet will help you keep track of these important dates!
Free Printable Garden Planner
Frequently Asked Questions: What fruit and vegetable seeds can be started indoors? What seeds shouldn’t be started indoors? When should seeds be started indoors for spring gardening?
Starting seeds indoors gives you the ability to grow a variety of fruits and vegetables that can’t always be found at a local nursery! However, not all seeds do well with an indoor start. Seeds to start indoors include:
Broccoli
Brussel Sprouts
Cabbage
Cauliflower
Cantaloupe
Cucumbers (take care when transplanting)
Eggplant
Lettuce
Kale
Peppers
Pumpkins (take care when transplanting)
Swiss Chard
Tomatoes
Watermelon (take care when transplanting)
Squash
Zucchini
Corn (difficult, but can be done)
Peas (take care when transplanting)
In general, root vegetables shouldn’t be started indoors due to the disturbance caused during transplant. Seeds that shouldn’t be started indoors include:
Beets
Carrots
Okra
Peas
Parsnips
Potatoes
Radishes
Sweet Potatoes
To determine when to start seeds indoors, take a look at the seed packet. Each seed packet will clearly state when to start the seed by referencing the last frost date. This is why it is so important to know your last expected frost date.
It is easiest to determine when to plant seeds by creating a seed log book to keep track of dates and plant needs. You can download mine for free by clicking here!
Make a list of each plant you’ll be starting, then work to figure out when to start the plants by subtracting the number of weeks prior to the last frost date that it is recommended to start the seeds.
For example, if my last frost date is June 10th, and I’d like to start broccoli which can be started 7-9 weeks before the last expected frost date, I can start my broccoli seeds anywhere between April 8th-April 22nd.
Complete this process early each year to give you ample time to start seeds that need a little more time. Of course, you can always start these seeds a little later, but this will decrease the number of growing days, which are like gold for cold climate gardeners.
The beauty of starting seeds indoors is that it allows you to get a jumpstart on your summer garden to extend the number of growing days! This allows you to grow plants with a very long harvest period such as broccoli and cauliflower.
I hope this post about starting seeds indoors is helpful as you grow your own garden! Enjoy the free printable, and have a wonderful gardening season friends!

This is so helpful!!
Hey Chloe! Great article, growing your own produce can be gratifying. We had a garden with our inlaws, and it was always nice to know what was going into the whole process. No chemicals and we chose non-GMO seeds. Unfortunately we all downsides so we no longer have a garden.
We included you on our best farmhouse sites to follow in 2019. Check it out here https://www.annieandoak.com/blogs/design-style/best-modern-farmhouse-sites-award
Thanks again,
Kyle
Where can I download your seed starting logbook? There are no working links to it on this page.
The links to your seed starting logbook aren’t working.
Printed out and going to start on these tomorrow! Thank you so much! <3
Yay!! I just saw your comment – how are your seedlings doing!? xo
I’ve started my plants way too early but there are some very helpful hints in here. Thank you!
Awesome info for this rookie!! Thankyou
Thank you! I wish you all the gardening success this year! :)
Excellent blog!
You did amazing job.