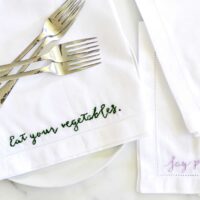
This DIY embroidered napkin project was my first time embroidering. Ever. It was so easy! These handmade napkins make such a lovely Mother’s Day gift or thoughtful handmade gift for any occasion!

This was my first time embroidering. Ever. It was so easy!
There are many techniques to embroidering, but the easiest of all is the back-stitch. Essentially, you pull the thread through about 2 mm ahead of where you want the stitch to go, then pull it through and back stitch. There’s nothing to it!
I also enjoyed learning how to do the Stem Stitch for this DIY embroidered napkin, which is a forward moving stitch, you simply bring the thread up through the fabric, and stitch forward, but as you go forward you stitch in an ever so slight diagonal direction.
This is an excellent trick for adding thickness to downstrokes of cursive letters to achieve the look of calligraphy, I added extra ‘diagonality’ <- I don’t think that’s a real word… to my stitches in places that I wanted letters to have a thicker stem.

Even if you don’t have plans to start embroidering, this is a great project to make for Mom this mother’s day, or if you’re like me, to make for yourself.
I wanted to include cheeky ‘mom quotes’ to fit the bill, but you could embroider anything your heart desires! Try your monogram or last name, the options are endless.
Love Sewing Ideas? Try these projects!
- Homemade Rice Heating Pad
- How to Embroider Cursive Napkins
- DIY Paperless Towels
- Three Thread Rolled Hem Napkins
DIY Cursive Embroidered Napkin
Equipment
- Embroidery Hoop
- Embroidery Needle
Materials
- Hemstitch Napkins
- Embroidery Thread
- Pencil
- Free Printable
Instructions
- Print out the template, then cut each saying out.
- Pin each saying into place under each napkin.
- Trace the saying with a pencil.
- Embroider the text using backstitching, or stem stitching! French knots are great for periods and adding dots to j’s and i’s.
Looking for another DIY sewing project? Learn how to make a faux leather market tote!
Conclusion
Embroidery may seem intimidating, but with just a few simple stitches, you can create something truly special. This DIY embroidered napkin project is proof that even beginners can craft a thoughtful, handmade gift with ease. Whether you’re personalizing napkins with cheeky mom quotes, monograms, or delicate cursive lettering, the beauty is in the details. Perfect for Mother’s Day or as a charming addition to your own table setting, these embroidered napkins bring a timeless, handmade touch to any occasion. Ready to get stitching? Follow the step-by-step guide and explore more of my favorite DIY sewing projects for inspiration!
I love the "mom sayings", they make me laugh! Embroidery has been one of my favorite crafts since I was a kid! It’s still something I pull out regularly, because it’s a craft I can do without a lot of materials.
You are probably laughing at my amateur attempt at embroidering! I would love any tips you might have!
These are beautiful and such a wonderful gift idea!
Thank you! I loved making them!
Wow! This is amazing. What a wonderful and personal gift idea. I’m so impressed with your skills.
Thank you! They aren’t ALL that great, but it’s been a fun new skill to learn!
These are so cute! I’ve embroidered before, but never realized there were so many types of stitched….I just stuck the needle into the fabric and pulled it through until my project looked right ;)
Jamie, that was pretty much exactly how I did this project ;) No shame!
These are so pretty! I love how personal they are as a gift! I’m terrible at sewing though! I can’t even sew to fix a tear in something. I don’t even having a sewing kit. That’s definitely something I need to work on!
I am incredibly lazy and always end up sourcing things like that out. I only really like to make new fun things! :)
I love embroidery and really should get back to it – haven’t done anything lately since I have been busy knitting! These are beautiful! Thank you!
It is very relaxing, I had so much fun doing it sitting in front of the TV! Thank you for reading!
These are beautiful! I don’t know anyone who wouldn’t love to receive these as a gift…great Mother’s day gift idea or even for Thanksgiving and Christmas!
I totally agree, but maybe I am a little biased. Thank you!
These are so pretty! What a great Mother’s Day gift idea! <3
Thank you! It was so fun to make!
It’s so encouraging to know this was your first time! Thanks! I love these!
Like I told Jamie, I sort of stuck the needle in, then pulled it through until it looked right :) thank you!
These are so gorgeous! I love this idea, I pinned for later and am definitely going to recreate these!
Oh thank you so much for pinning! Happy crafting!
So pretty! What a great gift.
Thank you! Thanks for being here!
These are the cutest! You did such a great job!!!
Thanks sista! I have so many ideas now :) ex: Goat handkerchiefs
Those are stinkin adorable!!
Thank you so much! I loved making them!
This is SUCH an adorable idea. What a sweet gift idea, too!
Could you please tell me what do you used?